[Prophet Abraham, peace be upon him, said:]“O my Lord! Make me one who
establishes regular prayers, and [the same for] my offspring, our Lord, accept
my invocation.” (Qur'an 14:40)

Wednesday, 19 December 2012

Squares and Rectangles lapbook

Assalamo aleykum,
Alhamdulillah we managed to wrap up some nice activities about squares and rectangles. I had originally thought of having a lapbook about quadrilaterals (with trapezoids, rhombuses and parallelograms too) but there wasn't going to be enough space to explore the difference between all of those shapes. So we stuck with the easier ones for the time being. It is very similar to our Triangles Lapbook, and again it all started with an Amazon box I had received a book in (alhamdulillah for saving them!):
 
 
The colour scheme is a little out there ... eh eh. Anyway, the first part is a collection of some creative bits and bobs: Yusef cut out and coloured his own cardboard shapes (and made some holes in them so they could breathe... bless him!) and then we built a robot using squares and rectangles (the base of the robot was one we had left from this build your own robot craft kit, but it can easily be recreated).
 
On the middle section we built the shapes with cut drinking straws, the straight parts for sides and the bendy bits to make angles, and we made a little flap inside each shapes under which we hid the answer to the questions:


(^^In the middle of the assembly work, Yusef decided he had to spell my name with sticky letters, so I included in the lapbook. Apparently my name is "Mommi", see above, bottom right <3 masha'Allah)
 
The third part is the one that is full of surprises. On the outer part of the horizontal flaps we stuck 3 minibook we had made, 2 of them are collections of geometrical puzzles - intended for much older people - but that I use to let Yusef practise his ability to identify the shapes (those that are more apparent of course) and to count them, within his ability of course:
 
 
 Unlike the similar minibook we made about triangles,most of these puzzles each featured more than one kind of shape, s he had to be careful to colour only the one that was relevant to the exercise:


The 3rd minibook features pictures of objects that can be either square or rectangular, labelled with the object name that Yusef traced, masha'Allah. I do realise all objects are 3D, so I tried to choose flat things, to make it less obvious to a 4 year old:
 
 
Under the flaps, we practised some "measuring in non conventional units". I simply printed out some grid paper (medium and large from here ) on white and coloured paper and drew some shapes for Yusef to fill in with squares, cut from coloured paper. He then counted how many squares were needed to make each shape and wrote the numbers. (Barak Allahu feek to Aisha, my sister in Islam and "home educator extraordinaire" - masha'Allah - for telling me about non conventional units of measure!!!... I had no idea)
 
 
During a recent conversation with my (birth) sister, I was reminded about PATTERNS and though "We haven't done patters in ages!!!" so we devoted the last bits of space left (under the horizontal flaps) to patters, made with squares cut out of the leftover card we had used:


This was good fun alhamdulillah :)
 
Everything can easily be found online/reproduced, however, if you want to save time, here is what I used (they are NOT looking very professional, please bear with me...):
 
Various labels (including blank speech bubbles to add to the finished work the best quotes from your child as he/she was making it)


Thursday, 13 December 2012

Arabic sandpaper letters

Assalamo aleykum,
 
I FOUND MY SANDPAPER!!!! ALHAMDULILLAH!!! (I had been looking for it for a few days and had started to despair, after even my husband - who is masha'Allah an excellent finder - had said he was going to buy me another pack). Excited as I was to have been reunited with my never-used-before craft material, I put the boys down for a nap and started making Arabic sandpaper letters (I just wanted to clarify it was the children's naptime, I didn't just shift them so I could play!...).
 
This is one of the most iconic Montessori resources, and it is one that parents often have a go ad making themselves. You can find many blogs or websites that explain how to, but I really like this on a blog called  The Accidental Crafter. That was my main inspiration.
 
First thing you need some card, either coloured or you can paint it yourself. One colour for the consonants and a different one for the vowels. I chose to cut my cards size A6 but I could have gone bigger.
 
Then, you need to print out the letters in a very big font. For the Roman alphabet, you can dowload the Montessori font for free online, but here I was doing Arabic letters, so I used the large colouring alphabet available on Yemen Links, which is ideal masha'Allah not only because of the size, but also because it's in an outline font (using a font that is not hollow in that big a size means using a looooot of ink, especially given that all you need is the outline).
 
Next, turn over the papers where you printed your letters and, with a pencil, trace the letters on the back, to obtain their mirror image. Cut roughly around each letter and glue them on the back of the sandpaper, remember to put the glue on the printed side of the letters, not the one you traced, so you can have them mirror image up.

 
Then proceed to cut them out very carefully and precisely ... bismillah!...


Next, glue them on the cards you prepared (it helps if, after cutting out the main body of a letter, you use the sandpaper cutting to help you place the dots exactly where they were insha'Allah).


Finally, just spread them all out and bask in their coolness!!!!!!!!

 
...oh, yeah! the children...I forgot!... yeah, although my elder has already been able to recognise the Arabic letters (in isolation) for some time masha'Allah, and my younger is still too young (he would eat them), I will focus on how to write them, tpencil control, he movements he should do, where to start from etc. I might add it on to each card if I see that he struggles.
 
....OR, I can just keep them all for myself ... MUWAHAHAHAHA!!!

Wednesday, 12 December 2012

Rewards of home education


Assalamo aleykum.
Yesterday I taught Yusef the Arabic short vowels (fatha, kasra, dhamma), using some lovely resources available online (which I will post soon with picture of the end result of our efforts insha'Allah), all I wanted to share with you was the sudden thought I had while my son was reading "A...A...U...I...U...": I taught him this, by the will of Allah, and if Allah wills I will gain some rewards EVERY TIME my son - in the course of his life - will pick up a mushaf and read anything from it, as it was me who (by the will of Allah) shared and instilled in him the basic knowledge to enable him to carry out this wonderful act of love and devotion.
 
On top of the feeling of warmth and excitement I experience as I imagine my son that fluently reading the Book of Allah, it makes me extremely happy and it feels me with hope to imagine all my little rewards, millions and millions of them, piling up, jingling like little coins, or better still, immaculate diamonds on the scale of my good deeds. May Allah make it so, may He purufy my intentions and make me a good teacher for His sake. And al of you, of course.

Wednesday, 5 December 2012

Our first lapbook is finished! alhamdulillah

Assalamo aleykum,

Since researching a little about lapbooking, I have been really really excited about it. It seemed like a very interactive and very creative way to collect the various bits and bobs we would otherwise do and consolidate learning.

Let alone that it is totally up my street, craft-wise...*emanates hearts*

Given that I am still playing it by ear and that Yusef seems obsessed with shapes lately, I decided we'll start with a lapbook on triangles. It seemed like an obvious choice since it is the shape with the least sides.

Now this may seem an ordinary Amazon box to you...

But once opened...TA DAAAA!!!!
 
First thing first: I printed off 2 A4 sheets of (large triangle) isometric paper from here to work as background, you could print more and cover the whole thing, but I wanted to leave some white.
 
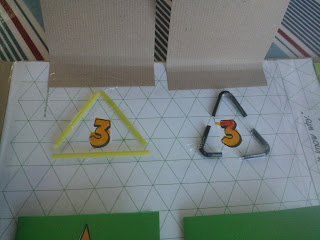
Then we started off counting sides and angles of the shape. Not a problem for Yusef since we have just introduced polygons masha'Allah... but how to represent it? We chose to cut up drinking straws and pick 3 straight segments to demonstrate the number of sides, and 3 of the bendy bits to represent the three angles:
 
 
Then we went on to speak about the different kinds of triangles. After thinking of the possible ways to categorise them, I decided to just do so according to their sides (and not angles) so we made 3 flaps, for equilateral, isosceles and scalene triangles. I let Yusef trace the adjectives and place them on the outside of the flaps, as well as an example of each triangle.
 
 
We used sticky starts to mark the sides that are the same. Inside he traced the definition of each kind of triangle (I also put it in print, for clarity's sake, as he can get carried away with the tracing and make it a little "obscure" masha'Allah). We added a few example of each.
 
The pictures of triangles are from math-salamanders.com (each printable also come in b/w for the child to colour, personally I thought Yusef already had enough colouring in, as you will soon see...).
 
The 2 orizontal flaps (on the right side of the box) were covered with green paper (since the isometric grid we printed was - randomly - green, I chose that as main colour). On the ouside of the lower flap, we stuck the mini book we made about triangle road signs.
 
I simply collected pictures of triangle road signs from the internet and wrote a simple description for Yusef to match. I picked signs that are quite self explanatory. If you want, I can spare you the search, here they are: Triangular road sign activity minibook
 
On the top flap we stuck a pocket (not a proper lapbook pocket, but an empty pack of blue-tack covered in green paper! ... I had lovely templates, but my printer didn't take the cardstock I have and I was impatient ...).
 
The pocket contains some really great colouring job Yusef did over the last couple of days, identifying all the triangles in the shapes I found online by googling "How many triangles can you see?"


I cut the pictures and mounted them on some cards, punched a whole (or a few, in some cases...oops!) and we secured them with some string. The pictures to colour in are here: How many triangles can you see? you could make into a minibook too.

Inside the flaps it's a collection of pictures of triangular things. Again, from the internet. I also printed labels in a tracing font for Yusef to trace the names of the objects. There's a lot of flying things, because he is very much into planes and similar things at the moment. Here are most of the pictures I used: Pictures of triangular things


Here we also included a minibook (the hexagonal one above) taken from Enchanted Learning, but instead of drawing the items mentioned (Yusef is not much for drawing), we cut out pictures.

(By the way, NEVER google an image with the word "underwear"... seriously, what immediately popped out was enough to turn my stomach...I might be naive but also people are sick out there!!!)

Here is our lapbook, we really enjoyed making it, although Yusef saw all the bits and pieces together so one second he was tracing, then the next he was colouring in and after another 2 seconds he was cutting...lol. I'll make sure I hid the material next time! Insha'Allah we'll make one also for other categories of shapes... watch this space!

Monday, 3 December 2012

Cooking with your child :))

 
Assalamo aleykum everybody.
I really believe that children should be taught to cook for many reasons, some of which are:
 
a) Because it makes them much better eaters (I have a fussy eater and his approach to lunch changes enormously if I let him add something to the pot, stir and taste the sauce!...).
 
b) It is a necessary life skill!!! (I have come to the UK from Italy aged 21 without having EVER so much as boiled an egg in my entire life. I cooked my first plate of pasta under the supervision of a friend, and always enjoyed cooking since).
 
c) I am (so far) a mother of boys only masha'Allah, and I want to make a point as strongly as possible, that boys should be taught to carry out every single household chore because they'll have to pull their weight in the house too when they are married insha'Allah, just like our beloved Prophet (saws) used to do!!!
 
d) Because I strongly believe children should be brought up to help in the house in a way that is appropriate for their age. Every morning, after having his bottle of milk snuggled on the sofa with me, my 18 months old trots with it to the kitchen and puts it near the sink masha'Allah, may Allah bless him and make him even better <3
 
Which brings me to the book:
 
 
It was recommended by a sister on Facebook so I got it from Amazon (used, although it looked absolutely new, for 1p!!!!).
This is hands down the best baking book for children I have ever seen, in fact one of the best baking books in general! Every recipe, as weel as ingredients and tools necessary, are shown in clear pictures so that even a child that doesn't read can follow the procedures. There are basic recipes and many great way to create variations on them. It is such an inspired concept!
 
I bought "Baking with tots blah blah blah" books before, and they use many hundreds words to explain to you how your child can do this and that "point 34c of recipe: now you can let your child mix"... the only child-friendly feature of the book was the decoration on the cakes pictured, which is absolutely too sofisticated and complicated not only for a child to do, but also for a grown up with a child in the kitchen!!!
 
This one is completely different: it is for children to use! My son liked it so much that used to "read it" a lot even when we were not baking.
 
A little while ago we went shortbread crazy with one of the recipes of this book.
This is the tray we baked (after "quality control"):

 
They were yummy masha'Allah, we also did lots of the chocolate variety.... <3

Saturday, 1 December 2012

Family tree (you HAVE to make this)

Assalamo aleykum,
 
today I was talking with a friend of mine about keeping good relations with our non-Muslim families, a very popular topic of conversation among us Muslim "converts". As both me and my friend home educate, I suggested her this activity that I, in turn, came across thanks to a sister on Facebook (sometimes it can have a use!). Here it is: The Family Tree.
 
You simply HAVE TO make it for 4 reasons:
 
1) It is very easy, as it comes with its own templates that you can download here. If you don't have foam, then use card on a cardboard base, as I did (actually the base was the 2 large sides of a cereal box stuck together).
 
2) It is very interactive: my son couldn't get enough sticking leaves! we made extra ones and he asked me to cut out so many we also made another tree just for him to stick leaves on it to his heart's content. He also loved helping to cut the grass (this was quite a while ago so his scissors skills were not what they are today masha'Allah).
 
3) It can be a lovely present for your child's grandparents, as it sends out a message that is usually very close to their heart, i.e. that they are also part of that child that they love so much, despite the differences. It conveys the feeling that we do not outright reject their legacy, on the contrary we treasure what of it does not oppose our beliefs and care to transmit it to our children. (It is a little craft that says a lot indeed!!!)
 
4) It is rather beautiful ma sha' Allah. Here's ours. We used only coloured card and a nice matching  ribbon as a frame.

 
 Here it is hanging on the wall in grandma's house :)